Guard

Guard Process


Guard는 '경비' 라는 뜻대로, Application을 보호하고, 유효한 사용자(authentication, 인증: 애플리케이션의 유효한 사용자인지 확인), 권한(authorization, 인가: 사용자에게 허가된 작업인지 확인)을 검증하는 역할을 한다. 검증된 사용자가 아니면 요청 자체를 막아버리는 것이다. 예를 들면, 사용자에 대한 검증이 없다면 모든 요청에 대해 응답을 할 것이고, 서버 자원에 낭비가 지속되면 서버 부하 / 다운의 결과를 초래할 가능성이 높다.


일반적으로 기존 Express.js 서버에서는 미들웨어(middleware)에 의해 처리되었다. 미들웨어는 인증을 위한 휼륭한 선택이지만, 토큰 검증이나 속성 연결과 같은 작업을 관리하기 힘들다.

→ 가드는 모든 미들웨어 이후에 실행되지만 인터셉터나 파이트 이전에 실행된다


JWT(Json Web Token)을 활용하여, 사용자 인증과 인가를 구현하는 방법을 작성하였다.


  1. 사용자 로그인 성공 시, AccessToken과 RefreshToken을 발급
  2. 로그인 이후 사용자는 Request Header에 AccessToken을 포함하여 요청
  3. 사용자는 AccessToken이 만료되면, 발급 받았던 RefreshToken을 통해 새로운 AccessToken을 발급

추가적으로 사용자 인증 전에는 AccessToken을 가지고 있지 않기 때문에, 로그인 로직에서는 Guard 검증을 거치지 않도록 설정


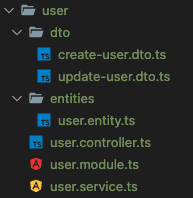
NPM 패키지 설치

npm i --save @nestjs/jwt

📔 src/auth/guard/public.decorator.ts

import { SetMetadata } from "@nestjs/common";

export const Public = () => SetMetadata('isPublic', true)

사용자 로그인 이전에는 Jwt 토큰이 없기 때문에, 함수 데코레이터 선언을 통해 로그인 API에서는 인증 가드 검증을 하지 않도록 할 예정


Auth Module, Service, Controller 작성


📔 src/auth/auth.module.ts

import { Module } from '@nestjs/common';
import { AuthService } from './auth.service';
import { JwtModule } from '@nestjs/jwt';
import { AuthController } from './auth.controller';
import { UserModule } from '@src/user/user.module';

@Module({
  imports: [JwtModule.register({
    global: true
  }), UserModule],
  providers: [AuthService],
  controllers: [AuthController]
})
export class AuthModule { }


📔 src/auth/user.module.ts

더보기
import { Module } from '@nestjs/common';
import { UserService } from './user.service';
import { UserController } from './user.controller';
import { TypeOrmModule } from '@nestjs/typeorm';
import { User } from './entities/user.entity';

@Module({
  imports: [TypeOrmModule.forFeature([User])],
  controllers: [UserController],
  providers: [UserService],
  exports: [UserService]
})
export class UserModule { }

UserService를 exports 설정


📔 src/auth/auth.service.ts

더보기
import { Injectable, InternalServerErrorException, UnauthorizedException } from '@nestjs/common';
import { ConfigService } from '@nestjs/config';
import { JwtService } from '@nestjs/jwt';
import { UserService } from '@src/user/user.service';

@Injectable()
export class AuthService {

    private readonly ACCESS_TOKEN_SECRET_KEY: string;
    private readonly REFRESH_TOKEN_SECRET_KEY: string;

    constructor(private readonly jwtService: JwtService
        , private readonly userService: UserService
        , private readonly configService: ConfigService
    ) {
        this.ACCESS_TOKEN_SECRET_KEY = configService.get<string>('SERVER.ACCESS_TOKEN_SECRET_KEY')
        this.REFRESH_TOKEN_SECRET_KEY = configService.get<string>('SERVER.REFRESH_TOKEN_SECRET_KEY')
    }

    async signIn(id: string, password: string) {
        // ID를 가진 사용자가 있는지 데이터베이스 조회
        const user = await this.userService.signIn(id);

        if (!user) {
            throw new UnauthorizedException('유저 정보 없음');
        } else if (user?.password !== password) {
            throw new UnauthorizedException('비밀번호 일치하지 않음');
        }

        const payload = { id: user.id, name: user.name }

        return {
            accessToken: await this.jwtService.signAsync(payload, {
                secret: this.ACCESS_TOKEN_SECRET_KEY
                , expiresIn: '10m'
            }),
            refreshToken: await this.jwtService.signAsync(payload, {
                secret: this.REFRESH_TOKEN_SECRET_KEY
                , expiresIn: '2w'
            })
        }
    }

    async getNewAccessToken(refreshToken: string) {
        try {
            // RefreshToken 검증
            const payload = await this.jwtService.verifyAsync(
                refreshToken,
                {
                    secret: this.REFRESH_TOKEN_SECRET_KEY
                }
            )

            // 새로운 AccessToken 발급
            return {
                accessToken: await this.jwtService.signAsync({
                    id: payload.id,
                    name: payload.name
                }, {
                    secret: this.ACCESS_TOKEN_SECRET_KEY
                    , expiresIn: '10m'
                })
            }
        } catch (e) {
            if (e.name === 'TokenExpiredError') {
                throw new UnauthorizedException('refreshToken 만료');
            } else if (e.name === 'JsonWebTokenError') {
                throw new UnauthorizedException('refreshToken 정보 없음');
            }

            throw new InternalServerErrorException(e);
        }
    }

}
  • ConfigService를 통해 환경 변수 관리 (ACCESS_TOKEN_SECRET_KEY,  REFRESH_TOKEN_SECRET_KEY)
  • 토큰 만료기간은 AccessToken은 짧게, RefreshToken은 길게 설정
  • JWT 토큰의 Payload(내용)는 사용자의 ID, 이름으로 구분


[NestJS] 환경 변수 (config) 사용하기

환경 변수, 파일을 사용하는 이유 - 프로젝트에서 공통적으로 사용하는 변수들을 파일을 통해 쉽게 관리할 수 있다 - 코드에 secret key 값을 노출시키지 않기 때문에 보안 상 이점이 있다 - 운영(pro

clichy12.tistory.com


📔 src/auth/auth.controller.ts

더보기
import { Body, Controller, HttpCode, HttpStatus, Post } from '@nestjs/common';
import { AuthService } from './auth.service';
import { Public } from './guard/public.decorator';

@Controller('auth')
export class AuthController {

    constructor(
        private readonly authService: AuthService
    ) { }

    @HttpCode(HttpStatus.OK)
    @Post('sign-in')
    @Public()
    signIn(@Body() user: Record<string, any>) {
        return this.authService.signIn(user.id, user.password);
    }

    @HttpCode(HttpStatus.OK)
    @Post('refresh')
    @Public()
    getNewAccressToken(@Body() body: Record<string, any>) {
        return this.authService.getNewAccessToken(body.refreshToken);
    }

}

Public 데코레이터를 선언하여,  로그인이나 새로운 AccessToken을 발급 받는 API 요청 시에는 인증 가드 검증을 하지 않도록 설정


Auth Guard 작성


📔 src/auth/guard/Auth.guard.ts

import { CanActivate, ExecutionContext, Injectable, InternalServerErrorException, UnauthorizedException } from "@nestjs/common";
import { ConfigService } from "@nestjs/config";
import { Reflector } from "@nestjs/core";
import { JwtService } from "@nestjs/jwt";
import { Request } from "express";


@Injectable()
export class AuthGuard implements CanActivate {

    private readonly ACCESS_TOKEN_SECRET_KEY: string;

    constructor(private jwtService: JwtService
         , private configService: ConfigService
         , private reflector: Reflector
        ) {
            this.ACCESS_TOKEN_SECRET_KEY = configService.get<string>('SERVER.ACCESS_TOKEN_SECRET_KEY')
        }

    async canActivate(context: ExecutionContext): Promise<boolean>{
        // Public 데코레이터를 선언한 라우터 경로는 JWT 토큰 검증을 하지 않음 (ex. 로그인)        
        const isPublic = this.reflector.get('isPublic', context.getHandler());
        if(isPublic){
            return true;
        }

        const request = context.switchToHttp().getRequest();

        // Request Header Authorization. JWT AccessToken 추출
        const token = this.extractTokenFromHeader(request);
        
        if(!token) {
            throw new UnauthorizedException('accessToken 필요');
        }

        try {
            // AccessToken 검증
            const payload = await this.jwtService.verifyAsync(
                token,
                {
                    secret: this.ACCESS_TOKEN_SECRET_KEY
                }
            )

            // 라우트 핸들러에서 접근할 수 있도록 Request에 payload를 할당
            request['user'] = payload;
        } catch (e){            
            if (e.name === 'TokenExpiredError') {
                throw new UnauthorizedException('accessToken 만료');
            } else if (e.name === 'JsonWebTokenError') {
                throw new UnauthorizedException('accessToken 정보 없음');
            }
            
            throw new InternalServerErrorException(e);
        }
        
        return true;
    }

    private extractTokenFromHeader(request: Request) : string | undefined {
        const [type, token] = request.headers.authorization?.split(' ') ?? [];
        return type === 'Bearer' ? token : undefined;
    }
}
  • Public 데코레이터를 선언한 라우터 경로는 검증 하지 않음
  • Header Authorization에 있는 JWT AccessToken 검증
  • 비즈니스 로직에서 JWT 정보를 사용할 수 있도록, Request에 Payload를 할당
  • canActivate 함수에서 false를 반환하면  403 Forbidden Error를 반환
  • 토큰 만료 시, 401 Unauthorized Error를 반환하도록 설정
  @Get()
  findAll(@Req() req: Request) {
    const user = req['user'];
    console.log(user);
    
    return this.productService.findAll();
  }


📔 src/app.module.ts

	...
import { APP_GUARD } from '@nestjs/core';
import { AuthModule } from './auth/auth.module';
import { AuthGuard } from './auth/guard/Auth.guard';

@Module({
  imports: [
                ...
                AuthModule
        	],
  controllers: [
  				...
  ],
  providers: [
  				...
  			{
            provide: APP_GUARD,
            useClass: AuthGuard
		 }],
})
export class AppModule implements NestModule {
	...
}

accessToken 없이 요청 시, 401 Error 발생
로그인 성공 시, 클라이언트에게 accessToken, refreshToken을 반환
발급 받은 AccessToken 값을 요청 헤더에 포함하여 요청 &rarr; 인증 가드 검증 성공
accessToken 만료 시, 클라이언트는 발급 받은 refreshToken을 통해 새로운 accessToken을 발급


+ Redis (NoSQL), RDBMS 를 통해  accessToken, refreshToken 관리

+ 사용자 로그아웃 시, JWT Token 폐기 로직


참고 링크


Documentation | NestJS - A progressive Node.js framework

Nest is a framework for building efficient, scalable Node.js server-side applications. It uses progressive JavaScript, is built with TypeScript and combines elements of OOP (Object Oriented Programming), FP (Functional Programming), and FRP (Functional Rea

docs.nestjs.com


🌐 JWT 토큰 인증 이란? (쿠키 vs 세션 vs 토큰)

Cookie / Session / Token 인증 방식 종류 보통 서버가 클라이언트 인증을 확인하는 방식은 대표적으로 쿠키, 세션, 토큰 3가지 방식이 있다. JWT를 배우기 앞서 우선 쿠키와 세션의 통신 방식을 복습해

inpa.tistory.com


[NestJS] Guard 사용하기

웹서버에서 중요한 것 중의 하나는 보안 관련한 로직일 것이다. NestJS에서는 허용된 User가 아니면 query나 Mutation, Subscription을 요청하지 못하도록 하는 Middleware를 제공한다. 이것을 UseGuard라는 decora

tre2man.tistory.com


'JavaScript > NestJS' 카테고리의 다른 글

[NestJS] Exception filters  (0) 2023.08.21
[NestJS] Swagger 적용하기  (0) 2023.08.21
[NestJS] TypeORM CRUD 생성하기 (User)  (0) 2023.08.21
[NestJS] 환경 변수 (config) 사용하기  (0) 2023.08.20
[NestJS] Logging 하기  (0) 2023.08.19


Client Side &rarr; Pipe &rarr; Route Handler &rarr; Filter &rarr; Client Side 과정을 거친다


NestJS는 예외 레이어(exceptions layer)가 내장되어 있어서, 애플리케이션 전체에서 처리되지 않은 예외를 처리할 수 있다


애플리케이션 (Application Code) 예외 처리

  • O : Exception Filter 에서 처리하지 않는다
  • X : Filter 에서 예외를 포착하여 적절한 사용자 친화적인 응답을 자동으로 보낸다


Global Exceptions Filter 생성


📔 src/middleware/exception/HttpExceptionsFilter.ts

@Catch() 데코레이터의 매개변수 목록을 비워, 처리되지 않은 모든 예외를 포착할 수 있다

import { ArgumentsHost
    , Catch
    , ExceptionFilter
    , HttpException
    , HttpStatus } from "@nestjs/common";
import { HttpAdapterHost } from "@nestjs/core";

@Catch()
export class HttpExceptionsFilter implements ExceptionFilter {
    constructor(private readonly httpAdapterHost: HttpAdapterHost) { }

    catch(exception: unknown, host: ArgumentsHost): void {
        const { httpAdapter } = this.httpAdapterHost;

        const ctx = host.switchToHttp();
        
        const httpStatus =
            exception instanceof HttpException
                ? exception.getStatus()
                : HttpStatus.INTERNAL_SERVER_ERROR; 
        
        const responseBody = {
            statusCode: httpStatus,
            timestamp: new Date().toLocaleString(),
            path: httpAdapter.getRequestUrl(ctx.getRequest()),
            message: "Http Exceptions Filtering",
            message1: "message1"
        }

        httpAdapter.reply(ctx.getResponse(), responseBody, httpStatus);
    }
}


📔 src/main.ts

	...
    
import { HttpExceptionsFilter } from '@src/middleware/exception/HttpExceptionsFilter'


async function bootstrap() {
  const app = await NestFactory.create(AppModule);

  const httpAdapter = app.get(HttpAdapterHost);
  app.useGlobalFilters(new HttpExceptionsFilter(httpAdapter));

	...

  await app.listen(port);
}
bootstrap();


Exception Layer Filtering


참고 링크

https://docs.nestjs.com/exception-filters

https://tristy.tistory.com/52

'JavaScript > NestJS' 카테고리의 다른 글

[NestJS] Guard + JWT 구현하기  (0) 2023.08.27
[NestJS] Swagger 적용하기  (0) 2023.08.21
[NestJS] TypeORM CRUD 생성하기 (User)  (0) 2023.08.21
[NestJS] 환경 변수 (config) 사용하기  (0) 2023.08.20
[NestJS] Logging 하기  (0) 2023.08.19


Swagger(스웨거)는 개발자가 REST 웹 서비스를 설계, 빌드, 문서화, 소비하는 일을 도와주는 대형 도구 생태계의 지원을 받는 오픈 소스 소프트웨어 프레임워크이다. 대부분의 사용자들은 Swagger UI 도구를 통해 스웨거를 식별하며 툴셋에는 자동화된 문서화, 코드 생성, 테스트 케이스 생성 지원이 포함된다. - wikipedia


NPM 패키지 설치

$ npm install --save @nestjs/swagger


src/config/swagger.config.ts

import { DocumentBuilder, SwaggerModule } from "@nestjs/swagger"

export default app => {
    const config = new DocumentBuilder()
        .setTitle('nest project')
        .setDescription('description')
        .setVersion('1.0.0')
        .build();

    const document = SwaggerModule.createDocument(app, config);
    SwaggerModule.setup('swagger', app, document);
}
  • http://localhost:3000/swaggerSwagger UI 접속


DocumentBuilder Options

더보기
import { OpenAPIObject } from './interfaces';
import { ExternalDocumentationObject, ParameterObject, SecurityRequirementObject, SecuritySchemeObject, ServerVariableObject } from './interfaces/open-api-spec.interface';
export declare class DocumentBuilder {
    private readonly logger;
    private readonly document;
    setTitle(title: string): this;
    setDescription(description: string): this;
    setVersion(version: string): this;
    setTermsOfService(termsOfService: string): this;
    setContact(name: string, url: string, email: string): this;
    setLicense(name: string, url: string): this;
    addServer(url: string, description?: string, variables?: Record<string, ServerVariableObject>): this;
    setExternalDoc(description: string, url: string): this;
    setBasePath(path: string): this;
    addTag(name: string, description?: string, externalDocs?: ExternalDocumentationObject): this;
    addSecurity(name: string, options: SecuritySchemeObject): this;
    addGlobalParameters(...parameters: ParameterObject[]): this;
    addSecurityRequirements(name: string | SecurityRequirementObject, requirements?: string[]): this;
    addBearerAuth(options?: SecuritySchemeObject, name?: string): this;
    addOAuth2(options?: SecuritySchemeObject, name?: string): this;
    addApiKey(options?: SecuritySchemeObject, name?: string): this;
    addBasicAuth(options?: SecuritySchemeObject, name?: string): this;
    addCookieAuth(cookieName?: string, options?: SecuritySchemeObject, securityName?: string): this;
    build(): Omit<OpenAPIObject, 'paths'>;
}


SwaggerModule.setup의 첫번째 매개변수는 swagger path를 의미


src/main.ts

	...
import swagger from './config/swagger.config';

async function bootstrap() {
  const app = await NestFactory.create(AppModule);

	...

  swagger(app);

  await app.listen(port);
}
bootstrap();


src/app/app.controller.ts  →  @ApiTags. @ApiOperation. @ApiOkResponse. @ApiBadRequestResponse

	...

@ApiTags('app tag')
@Controller()
export class AppController {

  constructor(private readonly appService: AppService) { }

  @ApiOperation({
    summary: '서버 상태 검사',
    description: '정상적으로 서버가 실행되고 있는지 확인'
  })
  @ApiOkResponse({
    description: 'OK'
  })
  @ApiBadRequestResponse({
    description: 'Bad Request'
  })
  @Head()
  getStatus() {
    this.appService.getStatus();
  }
  
  	...


swagger ui 확인


참고 링크

https://docs.nestjs.com/openapi/introduction

https://any-ting.tistory.com/122

https://www.npmjs.com/package/@nestjs/swagger

'JavaScript > NestJS' 카테고리의 다른 글

[NestJS] Guard + JWT 구현하기  (0) 2023.08.27
[NestJS] Exception filters  (0) 2023.08.21
[NestJS] TypeORM CRUD 생성하기 (User)  (0) 2023.08.21
[NestJS] 환경 변수 (config) 사용하기  (0) 2023.08.20
[NestJS] Logging 하기  (0) 2023.08.19

TypeORM 패키지 설치

$ npm install --save @nestjs/typeorm typeorm mysql2


MySQL 설치


[MacOS] MySQL 설치

brew 설치 $ /bin/bash -c "$(curl -fsSL https://raw.githubusercontent.com/Homebrew/install/HEAD/install.sh)" Homebrew Site MySQL 설치, 설정 # Installation $ brew install mysql # version $ mysql -V # server start $ mysql.server start # server stop $ my

clichy12.tistory.com


User 테이블 생성

CREATE TABLE `User` (
  `idx` bigint unsigned NOT NULL AUTO_INCREMENT,
  `id` varchar(100) NOT NULL,
  `password` varchar(100) NOT NULL,
  `name` varchar(100) NOT NULL,
  `createDt` timestamp NULL DEFAULT NULL,
  `updateDt` timestamp NULL DEFAULT NULL,
  PRIMARY KEY (`idx`)
)


# res: resource
$ nest g res user

spec.ts 파일은 삭제


src/config/typeorm.config.service.ts

더보기
import { TypeOrmModuleOptions, TypeOrmOptionsFactory } from "@nestjs/typeorm";
import { ConfigService } from "@nestjs/config";
import { Injectable } from "@nestjs/common";

@Injectable()
export class TypeOrmConfigService implements TypeOrmOptionsFactory {

    constructor(private readonly configService: ConfigService) { }

    createTypeOrmOptions(connectionName?: string): TypeOrmModuleOptions | Promise<TypeOrmModuleOptions> {

        return {
            type: 'mysql',
            host: this.configService.get('DB.MYSQL.HOST'),
            port: this.configService.get('DB.MYSQL.PORT'),
            username: this.configService.get('DB.MYSQL.USER'),
            password: String(this.configService.get('DB.MYSQL.PASSWORD')),
            database: this.configService.get('DB.MYSQL.DATABASE'),
            entities: [],
            synchronize: false,
            autoLoadEntities: true
        }
    }

}


entities : TypeORM에 Entity를 명시적으로 알린다, autoLoadEntities: true 를 사용하기 때문에 빈 배열을 넣었다

synchronize : 운영 환경에서 true 값을 사용하게 되면, 데이터가 손상될 수 있다

autoLoadEntities : true 일 경우, Entity가 자동으로 로드된다. forFeature() 선언을 통해 자동으로 추가될 예정

  • user.module.ts에서 TypeOrmModule.forFeature를 통해 선언 할 예정

src/app.module.ts

더보기
...
import { TypeOrmModule } from '@nestjs/typeorm';
import { TypeOrmConfigService } from './config/typeorm.config.service';

@Module({
  imports: [
  		...
  	, TypeOrmModule.forRootAsync({
      useClass: TypeOrmConfigService
    })],
	...
})
export class AppModule implements NestModule {
	...
}

src/user/entities/user.entity.ts

더보기
import { Column, Entity, PrimaryGeneratedColumn } from "typeorm";

@Entity()
export class User {

    @PrimaryGeneratedColumn()
    idx: number;

    @Column()
    id: string;

    @Column()
    password: string;

    @Column()
    name: string;

    @Column()
    createDt: Date;

    @Column()
    updateDt: Date;
}


데이터베이스 User 테이블과 동일한 속성으로 선언


src/user/user.module.ts

더보기
import { Module } from '@nestjs/common';
import { UserService } from './user.service';
import { UserController } from './user.controller';
import { TypeOrmModule } from '@nestjs/typeorm';
import { User } from './entities/user.entity';

@Module({
  imports: [TypeOrmModule.forFeature([User])],
  controllers: [UserController],
  providers: [UserService],
})
export class UserModule {}

$ npm i class-validator


데코레이터(@) 선언만으로  API 요청 시, 데이터 검증을 자동으로 해준다

@IsOptional()을 선언하지 않으면 해당 속성은 필수 속성이 된다


src/user/dto/create-user.dto.ts

더보기
import { IsDate, IsOptional, IsString, Length } from 'class-validator';

export class CreateUserDto {

    @Length(5, 50)
    @IsString()
    readonly id: string;

    @IsString()
    readonly password: string;

    @IsString()
    readonly name: string;

    @IsOptional()
    @IsDate()
    readonly createDt: Date = new Date();

    @IsOptional()
    @IsDate()
    readonly updateDt: Date = new Date();

}

src/user/dto/update-user.dto.ts

더보기
import { IsDate, IsOptional, IsString } from 'class-validator';

export class UpdateUserDto {

    @IsOptional()
    @IsString()
    readonly password: string;

    @IsString()
    readonly name: string;

    @IsOptional()
    @IsDate()
    readonly updateDt: Date = new Date();

}

src/user/user.service.ts

더보기
import { Injectable } from '@nestjs/common';
import { CreateUserDto } from './dto/create-user.dto';
import { UpdateUserDto } from './dto/update-user.dto';
import { InjectRepository } from '@nestjs/typeorm';
import { User } from './entities/user.entity';
import { Repository } from 'typeorm';

@Injectable()
export class UserService {

  constructor(@InjectRepository(User) private userRepository: Repository<User>) { }

  async create(createUserDto: CreateUserDto) {
    const user = await this.findOne(createUserDto.id);

    if (user.length > 0) {
      return [];
    }

    return await this.userRepository.save(createUserDto);
  }

  async findAll() {
    return await this.userRepository.find();
  }

  async findOne(id: string) {
    return await this.userRepository.find({ select: ['idx', 'id', 'name', 'createDt', 'updateDt'], where: { id } })
  }

  update(id: string, updateUserDto: UpdateUserDto) {
    console.log(id, updateUserDto);

    return this.userRepository.update({ id }, updateUserDto);
  }

  remove(id: string) {
    return this.userRepository.delete({ id });
  }
}

src/user/user.controller.ts

더보기
import { Controller, Get, Post, Body, Patch, Param, Delete } from '@nestjs/common';
import { UserService } from './user.service';
import { CreateUserDto } from './dto/create-user.dto';
import { UpdateUserDto } from './dto/update-user.dto';

@Controller('user')
export class UserController {
  constructor(private readonly userService: UserService) {}

  @Post()
  create(@Body() createUserDto: CreateUserDto) {
    return this.userService.create(createUserDto);
  }

  @Get()
  findAll() {
    return this.userService.findAll();
  }

  @Get(':id')
  findOne(@Param('id') id: string) {
    return this.userService.findOne(id);
  }

  @Patch(':id')
  update(@Param('id') id: string, @Body() updateUserDto: UpdateUserDto) {
    return this.userService.update(id, updateUserDto);
  }

  @Delete(':id')
  remove(@Param('id') id: string) {
    return this.userService.remove(id);
  }
}

$ npm i class-transformer


Documentation | NestJS - A progressive Node.js framework

Nest is a framework for building efficient, scalable Node.js server-side applications. It uses progressive JavaScript, is built with TypeScript and combines elements of OOP (Object Oriented Programming), FP (Functional Programming), and FRP (Functional Rea

docs.nestjs.com

...
  app.useGlobalPipes(
    new ValidationPipe({
      transform: true,
      whitelist: true,
      forbidNonWhitelisted: true
    })
  )
...

ValidationPipe 선언만으로 검증을 해줄 수 있다


참고 링크

https://docs.nestjs.com/techniques/validation

https://velog.io/@artlogy/08.-Validate

https://docs.nestjs.com/techniques/database

https://codegear.tistory.com/116

'JavaScript > NestJS' 카테고리의 다른 글

[NestJS] Exception filters  (0) 2023.08.21
[NestJS] Swagger 적용하기  (0) 2023.08.21
[NestJS] 환경 변수 (config) 사용하기  (0) 2023.08.20
[NestJS] Logging 하기  (0) 2023.08.19
[NestJS] Jest 테스트하기  (0) 2023.08.17

환경 변수, 파일을 사용하는 이유

- 프로젝트에서 공통적으로 사용하는 변수들을 파일을 통해 쉽게 관리할 수 있다

- 코드에 secret key 값을 노출시키지 않기 때문에 보안 상 이점이 있다

- 운영(prod), 개발(dev), 로컬(local) 환경에 맞는 다른 변수를 사용할 수 있다


패키지 설치

$ npm i @nestjs/config


src/app.module.ts

import { ConfigModule } from '@nestjs/config';
...

@Module({
  imports: [
    ConfigModule.forRoot({
      isGlobal: true,
      cache: true
    }),
    ....]
...

루트 모듈의 설정을 통해 환경 변수에 접근할 수 있도록 할 수 있다

isGlobal: true 속성을 통해 다른 모듈에서 사용할 수 있도록 설정하였고, cache: true 속성을 통해 한 번 읽은 환경 변수의 값을 캐싱하여 읽기 속도를 향상 시킬 수 있다


위 설정만으로 .env 파일에 선언된 속성을 바로 사용할 수 있다


프로젝트 루트 경로/.env

NODE_ENV=DEV
SERVER_PORT=3000


main.ts

	...

const SERVER_PORT = process.env.SERVER_PORT 

async function bootstrap() {
	...
  await app.listen(SERVER_PORT);
} 
bootstrap();

개발 환경에 따른 환경 변수 사용 방법


.env

NODE_ENV=DEV


src/config/dev.yaml 또는 prod.yaml

SERVER:
  PORT: 3000

DB:
  MYSQL:
    HOST: 127.0.0.1
    USER: root
    PASSWORD: root
    PORT: 3306


src/config/config.ts

import { readFileSync } from 'fs'
import * as yaml from 'js-yaml'
import { join } from 'path'

const YAML_CONFIG_PROD = 'prod.yaml'
const YAML_CONFIG_DEV = 'dev.yaml'

export default () => {
    return yaml.load(
        process.env.NODE_ENV === 'DEV' ?
            readFileSync(join(__dirname, YAML_CONFIG_DEV), 'utf8') :
            readFileSync(join(__dirname, YAML_CONFIG_PROD), 'utf8')
    ) as Record<string, any>
}


src/app.module.ts

...
import config from './config/config';

@Module({
  imports: [ConfigModule.forRoot({
      isGlobal: true,
      cache: true,
      load: [config]
    })],
  ...
})


src/main.ts

import { NestFactory } from '@nestjs/core';
import { AppModule } from './app.module';
import { ConfigService } from '@nestjs/config';

async function bootstrap() {
  const app = await NestFactory.create(AppModule);

  const configService = app.get(ConfigService);
  const SERVER_PORT = configService.get<string>('SERVER.PORT');
  
  await app.listen(SERVER_PORT);
} 
bootstrap();


$ npm run start:dev

서버 실행


yaml 파일은 compile 시에, dist 폴더로 복사되지 않기 때문에 파일을 찾지 못하는 문제가 발생


패키지 설치

$ npm i cpx


package.json

...
"scripts": {
    "copy-files": "cpx \"src/config/*.yaml\" dist/config/",
    ...
    "start": "npm run copy-files && nest start",
    "start:dev": "npm run copy-files && nest start --watch",
    "start:debug": "npm run copy-files && nest start --debug --watch",
    "start:prod": "npm run copy-files && node dist/main",
    ...
  },
  ...

컴파일 시에 dist/config 경로에 src/config/*.yaml 파일이 위치할 수 있도록 복사해준다


nest-cli.json  

{
  "$schema": "https://json.schemastore.org/nest-cli",
  "collection": "@nestjs/schematics",
  "sourceRoot": "src",
  "compilerOptions": {
    "deleteOutDir": false
  }
}

package.json - scripts 수정 후 실행해도 똑같은 오류가 발생한다. 파일이 복사되지만 바로 파일이 삭제되기 때문이다

deleteOutDir 속성 값을  true false 로 변경해 준다


참고 링크

https://codegear.tistory.com/82

https://www.daleseo.com/nestjs-configuration/

https://velog.io/@kimjiwonpg98/NEST-.env-%ED%8C%8C%EC%9D%BC-%EA%B4%80%EB%A6%AC%EB%B2%95-feat.-nestjsconfig

'JavaScript > NestJS' 카테고리의 다른 글

[NestJS] Swagger 적용하기  (0) 2023.08.21
[NestJS] TypeORM CRUD 생성하기 (User)  (0) 2023.08.21
[NestJS] Logging 하기  (0) 2023.08.19
[NestJS] Jest 테스트하기  (0) 2023.08.17
[NestJS] 경로 alias 설정하기  (0) 2023.08.17

Custom Log


src/middleware/logger/logger.service.ts

import { ConsoleLogger, Injectable } from "@nestjs/common";

@Injectable()
export class LoggerService extends ConsoleLogger {

    constructor() {
        super()
        this.setLogLevels(['verbose', 'debug', 'log', 'warn', 'error'])
    }

    appLog(message: string) {
        this.log(message)
    }

    errorLog(message: string) {
        this.error(message);
    }

}


src/middleware/logger/logger.module.ts

import { Module } from "@nestjs/common";
import { LoggerService } from "./logger.service";

@Module({
    providers: [LoggerService],
    exports: [LoggerService]
})
export class LoggerModule {}

src/api/api.module.ts  →  imports: [LoggerModule]

import { Module } from '@nestjs/common';
import { ApiController } from './api.controller';
import { ApiService } from './api.service';
import { LoggerModule } from '@src/middleware/logger/logger.module';

@Module({
  imports: [LoggerModule],
  controllers: [ApiController],
  providers: [ApiService]
})
export class ApiModule {}


src/api/api.controller.ts

import { Controller, Get } from '@nestjs/common';
import { LoggerService } from '@src/middleware/logger/logger.service';

@Controller('api')
export class ApiController {

    constructor(private loggerService: LoggerService) {
        loggerService.setContext(ApiController.name)
    }

    @Get('app')
    app() {
        this.loggerService.appLog('application log')
    }

    @Get('error')
    error() {
        this.loggerService.errorLog('error log')
    }

}

API 호출
console log 확인 완료


변수로 선언해서 사용


main.ts

const logger = new LoggerService();
logger.setContext('main.ts')


async function bootstrap() {

	...
    logger.appLog(`load main.ts`)
	...

}
bootstrap();


Middleware Log

미들웨어를 통해 API Request 요청 로그를 남겨보자


src/middleware/logger/logger.express.ts

import { Injectable, NestMiddleware } from "@nestjs/common";
import { LoggerService } from "./logger.service";
import { NextFunction } from "express";

@Injectable()
export class LoggerExpress implements NestMiddleware {

    constructor(private loggerService: LoggerService) {
        this.loggerService.setContext(LoggerExpress.name)
    }

    use(req: Request, res: Response, next: NextFunction) {
        this.loggerService.verbose(`${req.url} [${req.method}] ${JSON.stringify(req.body)}`);
        next();
    }

}


src/middleware/logger/logger.fastify.ts

import { Injectable, NestMiddleware } from "@nestjs/common";
import { LoggerService } from "./logger.service";
import { FastifyReply, FastifyRequest } from "fastify";

// $ npm i fastify
@Injectable()
export class LoggerFastify implements NestMiddleware {

    constructor(private loggerService: LoggerService) {
        this.loggerService.setContext(LoggerFastify.name)
    }

    use(req: FastifyRequest['raw'], res: FastifyReply['raw'], next: () => void) {
        this.loggerService.warn(`${req.url} [${req.method}]`);
        next()
    }

}


src/app.module.ts

import { MiddlewareConsumer, Module, NestModule, RequestMethod } from '@nestjs/common';
import { AppController } from './app.controller';
import { AppService } from './app.service';
import { ApiModule } from './api/api.module';
import { LoggerFastify } from './middleware/logger/logger.fastify';
import { LoggerModule } from './middleware/logger/logger.module';
import { LoggerExpress } from './middleware/logger/logger.express';

@Module({
  imports: [ApiModule, LoggerModule],
  controllers: [AppController],
  providers: [AppService],
})
export class AppModule implements NestModule {
/*
    path: '*'
    method: RequestMethod. ALL, GET, HEAD 등
*/
  configure(consumer: MiddlewareConsumer) {
    consumer.apply(LoggerExpress) // 또는 LoggerFastify
      .forRoutes({ path: '/api/*', method: RequestMethod.ALL })
  }

}

API 요청하기
console log 확인


참고 링크

https://docs.nestjs.com/techniques/logger

https://docs.nestjs.com/techniques/performance


Nest 프로젝트의 package.json - scripts의 테스트 명령어를 보면 Jest 테스트 라이브러리를 사용한다

테스팅 파일명에는 .spec 또는 .test 의 접미사가 있어야 한다


describe, it, test, expect

describe() 테스트 모듈을 그룹화하거나 계층별로 나눌 수 있고, it(), test(), expect()**** 키워드를 통해 테스트 코드를 작성한다

it()test() 키워드의 alias이며, 대체하여도 동일하게 작동한다


beforeAll, afterAll, beforeEach, afterEach

beforeAll(), afterAll() 는 테스트 파일의 시작과 끝에 한번 실행된다. 전역 변수를 관리할 수 있다

beforeEach(), afterEach() 는 테스트 파일 내 테스트 케이스의 시작과 끝에 실행된다


실행 순서

beforeAll → 
	[beforeEach → (describe - *it) → afterEach] → 
    	・・・ 
    →  [beforeEach → (describe - *it) → afterEach] 
→ afterAll

메서드 compile() 는 비동기식이므로 대기해야 합니다. 모듈이 컴파일되면 메서드를 사용하여 모듈이 선언하는 모든 정적 인스턴스(컨트롤러 및 공급자)를 검색할 수 있습니다


  beforeAll(async () => {
    const moduleFixture: TestingModule = await Test.createTestingModule({
      imports: [AppModule],
    }).compile();

    app = moduleFixture.createNestApplication();
    await app.init();
  });

단위 (Unit) 테스트


api.service.ts

import { Injectable } from '@nestjs/common';

@Injectable()
export class ApiService {

    /*
        get
    */
    getOne(id: number) {
        return id
    }

    getEmptyArr() {
        return []
    }

    getPlusOne(num: number) {
        return num + 1;
    }

    /*
        update
    */
    update(b: boolean) {
        return !b;
    }

}


api.service.spec.ts

import { Test, TestingModule } from '@nestjs/testing';
import { ApiService } from './api.service';
import { describe } from 'node:test';

describe('ApiService', () => {
  let service: ApiService;

  beforeEach(async () => {
    const module: TestingModule = await Test.createTestingModule({
      providers: [ApiService],
    }).compile();

    service = module.get<ApiService>(ApiService);
  });

  it('should be defined', () => {
    expect(service).toBeDefined();
  });

  describe('get', () => {
    it('should return id', () => {
      const id = 1;
      const ret = service.getOne(id);

      expect(ret).toEqual(id);
    })

    it('should return empty array', () => {
      const ret = service.getEmptyArr();

      expect(ret).toEqual([]);
    })
  })

  describe('update', () => {
    it('should return falsy', () => {
      const b = true;
      const ret = service.update(b);

      expect(ret).toBeFalsy();
    })
  })

});


테스트

$ npm run test


$ npm run test:cov


api.service.ts % Funcs 수치를 보면 75라고 나와있다. service.ts 파일의 함수는 총 4개인데, service.spec.ts에서는 3개의 함수의 테스팅 코드만 작성하였다


나머지 함수의 테스트 코드도 작성한 후, 실행하면 %Funcs 수치가 100으로 나온다


통합 (e2e, End to End) 테스트


npm run test:e2e 명령어를 통해 통합 테스트를 진행할 수 있다.


main.ts

import { NestFactory } from '@nestjs/core';
import { AppModule } from './app.module';
import { ValidationPipe } from '@nestjs/common';

async function bootstrap() {
  const app = await NestFactory.create(AppModule);
  app.useGlobalPipes(
    new ValidationPipe(
      {
        whitelist: true,
        forbidNonWhitelisted: true,
        transform: true
      }
    )
  )
  await app.listen(3000);
}
bootstrap();


test/app.e2e-spec.ts

  beforeAll(async () => {
    const moduleFixture: TestingModule = await Test.createTestingModule({
      imports: [AppModule],
    }).compile();

    app = moduleFixture.createNestApplication();

    app.useGlobalPipes(
      new ValidationPipe(
        {
          whitelist: true,
          forbidNonWhitelisted: true,
          transform: true
        }
      )
    )

    await app.init();
  });


main.ts에 app에 대한 설정 (ex.GlobalPipes)을 했다면, app.e2e-spec.ts 파일에도 동일하게 설정해 주어야 한다


참고 링크

https://docs.nestjs.com/fundamentals/testing

https://nomadcoders.co/nestjs-fundamentals

https://jestjs.io/docs/api

'JavaScript > NestJS' 카테고리의 다른 글

[NestJS] 환경 변수 (config) 사용하기  (0) 2023.08.20
[NestJS] Logging 하기  (0) 2023.08.19
[NestJS] 경로 alias 설정하기  (0) 2023.08.17
[NestJS] API 생성하기 (+ CORS)  (0) 2023.08.17
[NestJS] 시작하기  (0) 2023.08.17
import myCode from 'src/folder1/folder2/folder3/folder4/folder5/index

간단한 프로젝트는 상관 없지만, 프로젝트 규모가 커지면 코드에 표현되는 경로가 깔끔하지 않을 수 있음

절대 경로(alias)를 설정


첫번째 방법

tsconfig.json

{
  "compilerOptions": {
    ...
    "baseUrl": "./",
    ...
    "paths": {
      "@src/*": [
        "./src/*"
      ],
      "@src/api/*": [
        "./src/api/*"
      ]
    }
  }
}

두번째 방법

tsconfig.paths.json

{
  "compilerOptions": {
    "baseUrl": "./",
    "paths": {
      "@src/*": ["./src/*"],
      "@app/*": ["./src/app/*"],
      "@loader/*": ["./src/loader/*"],
      "@middleware/*": ["./src/middleware/*"]
    }
  }
}

tsconfig.json

{
  "compilerOptions": {
    ...
  },
  "extends": "./tsconfig.paths.json"
}

경로 적용 확인

app.modules.ts 파일 변경

변경 전
import { ApiModule } from './api/api.module';

변경 후
import { ApiModule } from '@src/api/api.module';

혹시 watch 모드로 실행되고 있다면 적용되지 않을 수 있다. 서버를 재실행하여 다시 확인해 보자


Jest 테스트를 위한 경로 설정

tsconfig.json 파일 설정으로는 *spec.ts 파일의 경로 alias가 적용이 되지 않는다

package.json

{
    ...
  "jest": {
    ...
    "moduleNameMapper": {
      "^@src/(.*)$": "<rootDir>/$1"
    }
  }
}

jest 테스트 경로 alias가 적용되었다

'JavaScript > NestJS' 카테고리의 다른 글

[NestJS] 환경 변수 (config) 사용하기  (0) 2023.08.20
[NestJS] Logging 하기  (0) 2023.08.19
[NestJS] Jest 테스트하기  (0) 2023.08.17
[NestJS] API 생성하기 (+ CORS)  (0) 2023.08.17
[NestJS] 시작하기  (0) 2023.08.17


NestJS는 강력한 CLI (Command-Line Interface)를 지원한다.

CLI 를 통해 API를 만들기 위한 모듈(module, mo), 컨트롤러(controller, co), 서비스(service, s)를 생성해보자


# CLI 통한 생성 방법
$ nest (generate|g) (name|alias) name


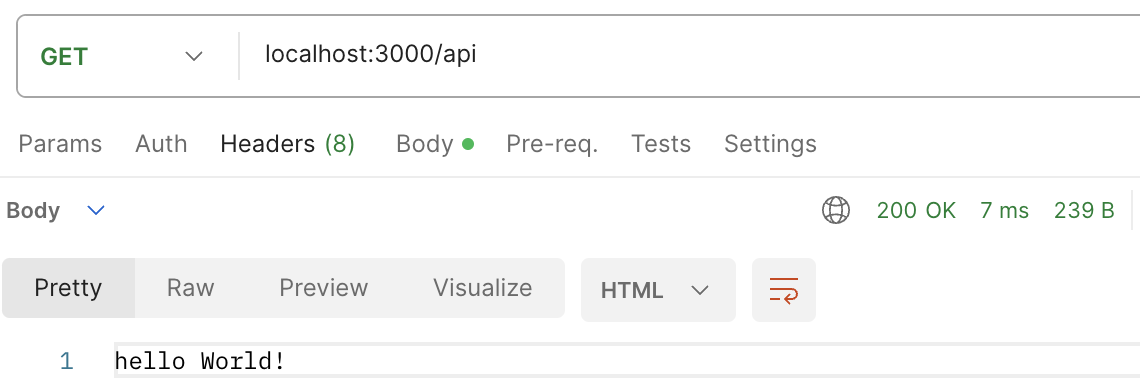
import { Controller, Get, Head } from '@nestjs/common';

@Controller('api')
export class ApiController {

    @Head()
    foo() {}

    @Get()
    get(): string {
        return 'hello World!'
    }

}

데코레이터(@)를 선언하여, API의 경로와 메서드를 정의할 수 있다.
* HEAD 메서드를 사용할 때, 동일한 경로의 GET 메서드가 존재한다면, 반드시 HEAD 메서드를 먼저 선언해야 한다
데코레이터는 중요하지만, 함수명은 의미가 없다. (하지만 함수명을 마음대로 짓자는 뜻은 아니다, 클린 코드


Express 모듈 사용하기

import { Controller, Get, Req, Request, Res, Response } from '@nestjs/common';

@Controller('api')
export class ApiController {

    @Get('express1')
    get1(@Request() request, @Response() response) {
        response.status(200).send(`${request.method} ${request.url} ${request.ip}`)
    }

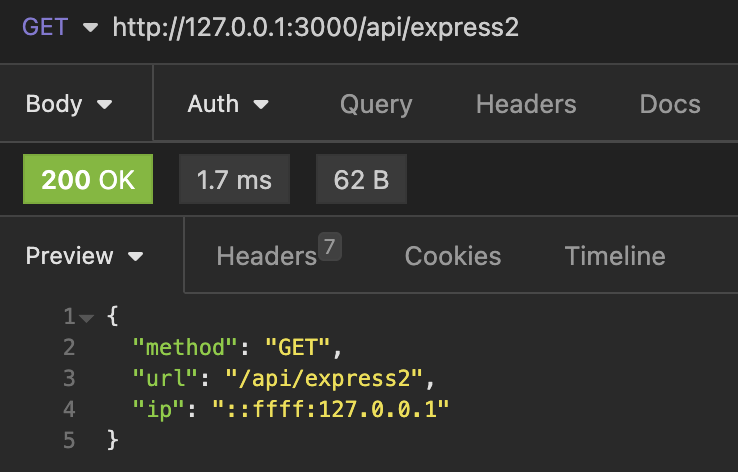
    @Get('express2')
    get2(@Req() req, @Res() res) {
        res.status(200).json({
            method: req.method,
            url: req.url,
            ip: req.ip
        })
    }

}


Query, Param, Body 사용하기

import { Body, Controller, Get, Param, Post, Query } from '@nestjs/common';

@Controller('api')
export class ApiController {

    @Get('param/:id')
    getParam(@Param('id') id) {
        return `id: ${id}`
    }

    @Get('params/:id/:name')
    getParams(@Param('id') id, @Param('name') name) {
        return `id: ${id}, name: ${name}`
    }

    @Get('query')
    getQuery(@Query('id') id) {
        return `id: ${id}`
    }

    @Post('body')
    postBody(@Body() body) {
        return body
    }

}


Put, Patch, Delete, HttpCode, Redirect

import { Body, Controller, Delete, Get, HttpCode, Patch, Put, Redirect } from '@nestjs/common';

@Controller('api')
export class ApiController {

    @Put()
    put(@Body() body) { }

    @Patch()
    patch() { }

    @Delete()
    @HttpCode(204)
    delete() { }

    @Get('redirect')
    @Redirect('https://nestjs.com', 301)
    getRedirect() {}

}

CORS  설정


첫번째 방법

import { NestFactory } from '@nestjs/core';
import { AppModule } from './app.module';

async function bootstrap() {
  const app = await NestFactory.create(AppModule);

  app.enableCors({ origin: "*", methods: "GET" })

  await app.listen(3000);
}
bootstrap();


두번째 방법

import { NestFactory } from '@nestjs/core';
import { AppModule } from './app.module';

async function bootstrap() {
  const app = await NestFactory.create(AppModule, {
    cors: {
      origin: ["*"]
      , optionsSuccessStatus: 200
      , maxAge: 300
      , credentials: true
    }
  });

  await app.listen(3000);
}
bootstrap();


참고 링크

NestJS Documentation - Custom decorators

https://docs.nestjs.com/controllers


'JavaScript > NestJS' 카테고리의 다른 글

[NestJS] 환경 변수 (config) 사용하기  (0) 2023.08.20
[NestJS] Logging 하기  (0) 2023.08.19
[NestJS] Jest 테스트하기  (0) 2023.08.17
[NestJS] 경로 alias 설정하기  (0) 2023.08.17
[NestJS] 시작하기  (0) 2023.08.17

Nest makes use of robust HTTP Server frameworks like Express (the default) and optionally can be configured to use Fastify as well!

  • Nest(NestJS)는 효율적이고 확장 가능한 Node.js 서버 (백엔드) 애플리케이션을 구축하기 위한 프레임워크
    • TypeScript, JavaScript 지원
    • HTTP 프레임워크를 활용하여 구성
      • Express: JavaScript로 작성되고 Node.js 런타임 환경에서 구동되는 인기 있는 웹 프레임워크
      • Fastify: 최대 효율성과 속도를 제공하는 데 중점을 둔 고성능 및 낮은 오버헤드 프레임워크
    • 프로그래밍 요소 결합
      • OOP (Object Oriented Programming) : 객체 지향 프로그래밍
      • FP (Functional Programming) : 함수형 프로그래밍
      • FRP (Functional Reactive Programming) : 함수 반응형 프로그래밍, 비동기 데이터 스트림 이용
    • CLI (Command-Line Interface) 지원


설치, 프로젝트 생성

# i: install , g: global , n: new
$ npm i -g @nestjs/cli
$ nest (n|new) <project_name>
$ npm install

Node 버전 16 이상에서만 NestJS 설치 가능, "node -v" 명령어로 버전 확인!
프로젝트 my-project 생성


프로젝트 기본 구조

동작 과정은 main.js → app.module.ts → app.controller.ts → app.service.ts로 진행


어플리케이션의 시작점&nbsp; main.ts


NestFactory.create( )  매개변수에 프로젝트에서 사용할 루트 모듈이 들어간다. 기본 구조에서는 app.module.ts 이 들어가있지만 커스텀 모듈을 지정할 수 있다
* 메인 함수명이 bootstrap 일 필요는 없다 (함수명 변경 가능)


Module (모듈)

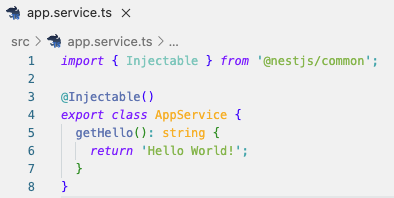
Provider와 Controller들을 논리적인 기능이나 도메인에 따라 하나로 묶어주는 역할을 하며, 재사용성을 높여줌

AppModule 에서는 데코레이터(@, Decorator) 를 사용해 컨트롤러와 프로바이더(서비스)를 명시

이유는  제어의 역전(IoC, Inversion of Control) 기술 중 하나인 의존성 주입(DI, Defendency Injection)을 하기 위함


Controller (컨트롤러)

외부와의 통신, 라우팅을 담당

constructor (생성자) 매개변수 선언을 통해 AppModule에서 선언한 의존성 주입을 사용할 수 있음


Provider (공급자)

Nest에서 가장 간단하고 작은 단위의 컴포넌트를 표현
비즈니스 로직
기본적으로 @Injectable() 데코레이터로 나타내며,  다른 프로바이더나 컨트롤러에 주입(Inject)될 수 있음
종류로는 가장 간단한 Service부터 Middleware, Pipe, Guard, Interceptor 등이 존재

*spec.ts 파일들은 테스트를 하기 위한 파일이다.

test 폴더에 있는 app.e2e-spec.ts 파일을 통합 테스트를 하기 위함

src 아래 위치에 속해있는 다른 spec.ts 파일은 유닛 테스트를 하기 위한 파일들이다.


package.json의 scripts 확인하여 테스트를 진행

$ npm run test
$ npm run test:watch
$ npm run test:cov
$ npm run test:debug
$ npm run test:e2e

Mac의 터미널(Terminal)을 통해 진행하다 보면 권한(permission) 문제 때문에, 막혀서 sudo 명령어를 계속 입력해 줘야 할 수 있다.
공부를 하기 위해서 chmod 명령어를 통해 권한을 열어주도록 하자

# '~'는 사용자의 폴더 경로를 뜻한다. (ex. /Users/sejin )
# 프로젝트에서 모듈 설치 시 (ex. npm install)
$ chmod -R 755 ~/.npm

# my-project는 내가 생성한 nest 프로젝트 폴더
# 프로젝트 실행 시 (ex. npm run start:dev)
$ chmod -R 755 my-project

참고 링크

NestJS Documentation
Nomadcoders Nest

'JavaScript > NestJS' 카테고리의 다른 글

[NestJS] 환경 변수 (config) 사용하기  (0) 2023.08.20
[NestJS] Logging 하기  (0) 2023.08.19
[NestJS] Jest 테스트하기  (0) 2023.08.17
[NestJS] 경로 alias 설정하기  (0) 2023.08.17
[NestJS] API 생성하기 (+ CORS)  (0) 2023.08.17

+ Recent posts