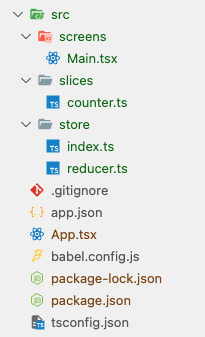
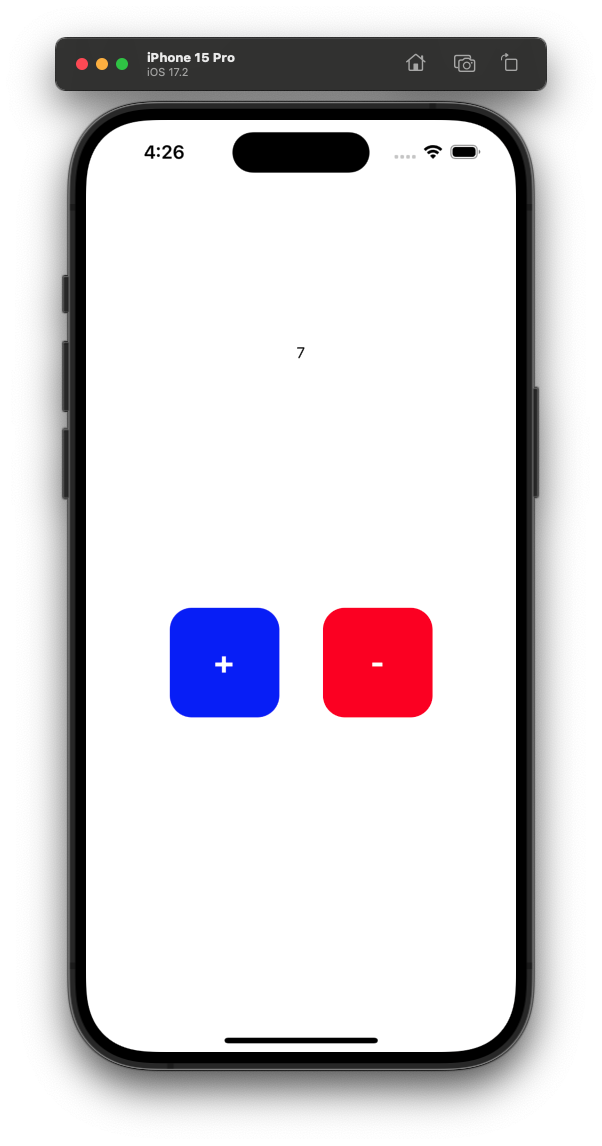
Redux 상태 관리 라이브러리
저장된 데이터를 전역에서 관리
NPM 설치
npm i redux
npm i react-redux
npm i @reduxjs/toolkit

App.tsx
import { Provider } from "react-redux";
import Main from "./src/screens/Main";
import store from "./src/store";

export default function App() {
  return (
    <Provider store={store}>
      <Main />
    </Provider>
  );
}
src/slices/counter.ts
import { createSlice } from "@reduxjs/toolkit";

const initialState = {
  count: 0,
};

const countSlice = createSlice({
  name: "count",
  initialState,
  reducers: {
    plusCount(state) {
      state.count += 1
    },
    minusCount(state) {
      state.count = state.count - 1;
    },
    setCount(state, action) {
      state.count = action.payload.count;
    },
  },
});

export default countSlice;
src/store/reducer.ts
import { combineReducers } from "redux";
import countSlice from "../slices/counter";

const rootReducer = combineReducers({
    countReducer: countSlice.reducer
});

export type RootState = ReturnType<typeof rootReducer>;
export default rootReducer;
src/store/index.ts
import { configureStore } from "@reduxjs/toolkit";
import rootReducer from "./reducer";
import { useDispatch } from "react-redux";

const store = configureStore({
    reducer: rootReducer,
    middleware: getDefaultMiddleware => {
        return getDefaultMiddleware();
    }
});

export default store;
export type AppDispatch = typeof store.dispatch;
export const useAppDispatch = () => useDispatch<AppDispatch>();
src/screens/Main.tsx
import { StyleSheet, Text, TouchableOpacity, View } from "react-native";
import { useSelector } from "react-redux";
import countSlice from "../slices/counter";
import { useAppDispatch } from "../store";
import { RootState } from "../store/reducer";

const Main = () => {
  const dispatch = useAppDispatch();
  const count = useSelector((state: RootState) => state.countReducer.count);

  const setCounter = (value: number) => {
    dispatch(
      countSlice.actions.setCount({
        count: value,
      })
    );
  };

  return (
    <View style={styles.container}>
      <View style={styles.view_container}>
        <Text>{count}</Text>
      </View>
      <View style={styles.button_container}>
        <TouchableOpacity
          style={StyleSheet.compose(styles.button, { backgroundColor: "blue" })}
          onPress={() => dispatch(countSlice.actions.plusCount())}
        >
          <Text style={styles.button_text}>+</Text>
        </TouchableOpacity>
        <TouchableOpacity
          style={StyleSheet.compose(styles.button, { backgroundColor: "red" })}
          onPress={() => {
            if (count > 0) {
              dispatch(countSlice.actions.minusCount());
            }
          }}
        >
          <Text style={styles.button_text}>-</Text>
        </TouchableOpacity>
      </View>
    </View>
  );
};

const styles = StyleSheet.create({
  container: {
    flex: 1,
    justifyContent: "center",
    alignItems: "center",
  },
  view_container: {
    flex: 1,
    justifyContent: "center",
  },
  button_container: {
    flex: 1,
    flexDirection: "row",
  },
  button: {
    width: 100,
    height: 100,
    alignItems: "center",
    justifyContent: "center",
    borderRadius: 20,
    margin: 20,
  },
  button_text: {
    fontWeight: "bold",
    color: "#ffffff",
    fontSize: 30,
  },
});

export default Main;

Installation | Redux
Introduction > Installation: Installation instructions for Redux and related packages
redux.js.org
'JavaScript > React Native' 카테고리의 다른 글
| [React Native] 프로젝트 생성 (0) | 2024.01.14 |
|---|